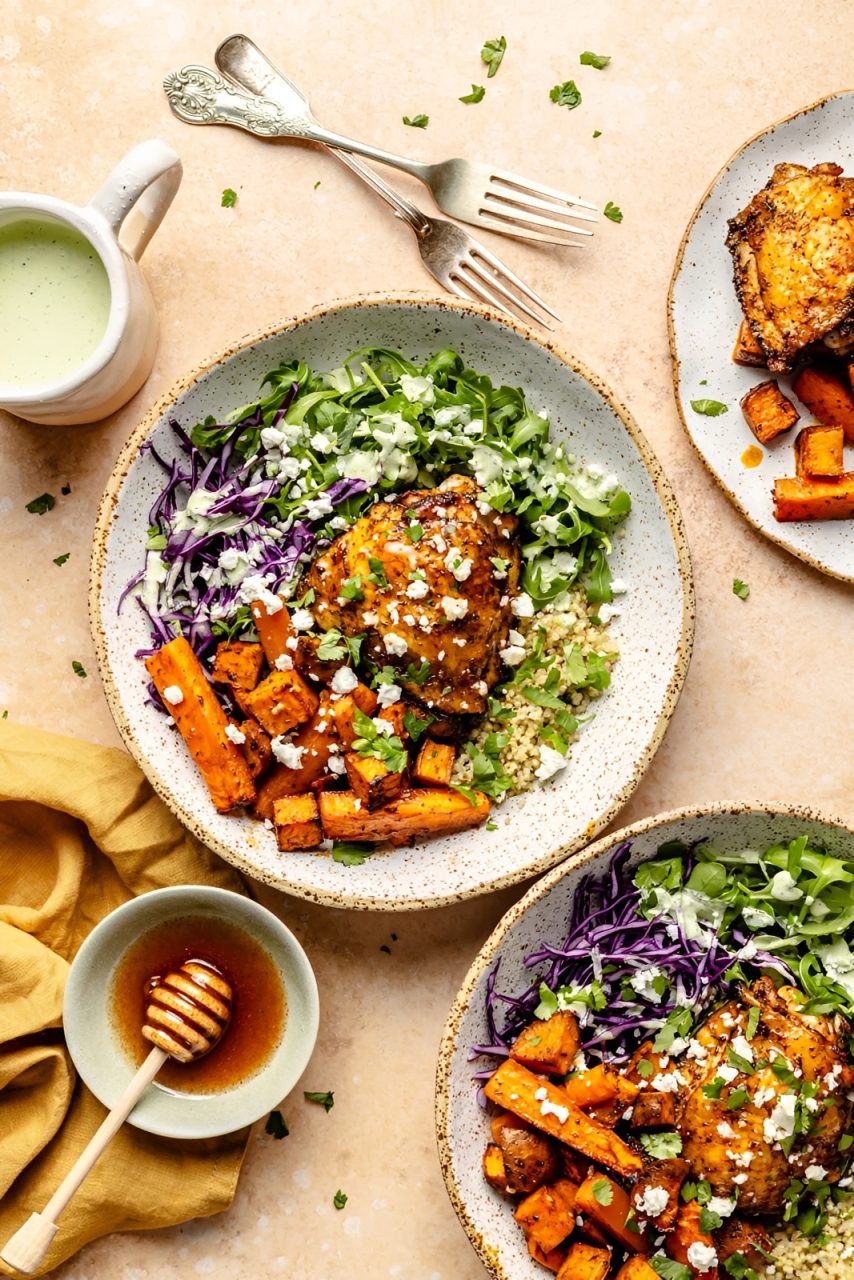
10.9.25 | For Buyers

The Importance of Property Photography and Videography When Listing Your Property in Canada

When it comes to selling or renting a property in today’s competitive Canadian real estate market, first impressions truly matter. Whether you’re in bustling Toronto, scenic Vancouver, or a peaceful town in Nova Scotia, your listing’s visuals can make all the difference. That’s where professional property photography and videography come in.

Why Photos and Videos Matter in Real Estate

According to industry research, listings with high-quality photos and videos receive significantly more views and inquiries than those without. In Canada’s growing online real estate scene—where most buyers start their search digitally—your property’s visual presentation can instantly attract (or turn off) potential buyers.

Think about it: before anyone books a showing, they’ve already made up their mind about whether your home feels right—based on what they see online.


1. Professional Photos Capture True Value

A professional real estate photographer knows how to highlight your property’s best features:

  • Natural lighting that makes rooms look bright and inviting

  • Angles that make spaces appear open and balanced

  • Detail shots that emphasize finishes, design, and craftsmanship

These subtle touches help buyers connect emotionally with your property—and visualize themselves living there.

Example: A well-lit kitchen photo showcasing modern countertops and sleek appliances will always perform better than a dimly lit, phone-taken shot.


2. Videography Brings the Property to Life

While photos are essential, videography takes engagement to the next level. Real estate videos and virtual tours give potential buyers a sense of flow, scale, and space—something static images can’t fully capture.

A cinematic walk-through video or drone footage of the neighborhood can help buyers experience the property before they even step inside. This is especially powerful in Canada, where many buyers are relocating from other provinces—or even other countries.


3. Stand Out in Online Listings

With thousands of listings competing for attention on platforms like REALTOR.ca, Zillow, and Facebook Marketplace, your visuals are your best marketing tool.
Professional visuals make your listing look:

  • More credible and trustworthy

  • More attractive and shareable

  • More likely to receive higher offers

In fact, Canadian real estate agents often report that listings with professional photography sell faster and for higher prices than those without.


4. Builds an Emotional Connection

Buying a home isn’t just a financial decision—it’s an emotional one. Beautiful, authentic visuals help potential buyers feel what it’s like to live there. Whether it’s the cozy fireplace, the sunset view from the balcony, or the spacious backyard—good photography and videography bring those feelings to life.


5. A Smart Investment for Sellers and Agents

Hiring a professional may feel like an added cost, but it’s actually an investment in your property’s marketability. The small upfront expense often translates into faster sales and better offers.

For agents, it also strengthens branding—showcasing professionalism, attention to detail, and dedication to client success.


Final Thoughts

In Canada’s fast-moving real estate market, you only get one chance to make a first impression. Stunning visuals can transform a simple listing into a standout opportunity that captures attention, drives traffic, and inspires buyers to take the next step.

So whether you’re selling a downtown condo in Toronto or a family home in Calgary, remember:

Great photos and videos don’t just show your property—they sell it.

10.9.25 | For Buyers

Cider Braised Pot Roast with Crispy Sage Butter Potatoes

Ingredients

  • Beef chuck roast
  • Kosher salt and black pepper
  • Flour
  • Salted butter
  • Yellow onions
  • Shallots
  • Apple cider
  • Chicken broth
  • Dry white wine
  • Chopped fresh thyme
  • Apple butter
  • Small to medium potatoes
  • Fresh sage leaves
  • Garlic powder
  • Flaky sea salt

Here are the details:

Step 1: Season the pot roast

Before you begin, season the roast well with salt and pepper. Then rub the roast all over with flour.

The flour will thicken the gravy over time so don’t skip it. If needed, feel free to use gluten-free flour.

Step 2: The onions

Now that you took care of the pot roast, start the onions. The key here is to slice them and use A LOT.

Toss the onions in a large Dutch oven that you can transfer to the oven. Let them cook along with the shallots in a little butter. You just want to get the cooking started but don’t fully cook the onions.

Step 3: Roast the pot roast

The rest of this process is so easy. Put the roast on top of the onions and rub the top of the pot roast with apple butter.

You can use homemade or store-bought apple butter. The apple butter is important. It adds a sweet, spiced autumn touch that’s delicious with all the onions and shallots. The apple butter will also help the roast caramelize in the oven. It’s wonderful.

Pour over the apple cider, add the wine, or feel free to use bone or chicken broth. Then add fresh thyme.

Step 4: The potatoes

Before you slide the pot roast into the oven, place 6 to 8 small to medium potatoes around the pot roast. It’s best to use buttery Yukon gold potatoes, but use your favorite, or what you have on hand.

Cover the pot roast, and start cooking. If you’re using the oven, this takes around three hours.

The potatoes cook at the very same time, and all in one pot! Woohoo!

Step 5: Finish the potatoes

Not denying it, these potatoes are reason enough to make this recipe. Because they’re slow-cooked in with the cider, their flavor and texture are most delicious.

Pull the potatoes off the roast and place them onto a baking sheet. Smash them down with a potato masher. Add pats of butter on and around the potatoes, then garlic powder and fresh sage.

Roast the smashed potatoes until they are very crispy. The butter naturally browns around each potato. It’s almost magical and most definitely the yummiest!!

Step 6: Finish the roast

While the potatoes cook, cook the pot roast. This time leave uncovered until the roast is deeply caramelized on top. The potatoes and pot roast will both be ready around the same time!

Step 7: Serve and enjoy

Finally, serve the roast, which should be tender and falling apart into the gravy and onions in the pot.

Serve up those crispy salty potatoes on the side.

The most perfect family dinner, so hands off too.

Of course, it’s best served with beer bread and a big salad! Great for Sunday nights all fall and winter long.

by Tieghan Gerard

09.11.25 | For Buyers

Stress-Free Home Buying in Canada: Why a Sales Representative is Your Secret Weapon

1. Unmatched Access to Listings Through the MLS®

Licensed agents in Canada provide access to the Multiple Listing Service (MLS®)—a highly comprehensive database that aggregates active, pending, and sold property listings with crucial details like price, features, and days on market. Without an agent, you might miss out on homes or valuable listing information only visible via MLS.

2. Deep Market Knowledge & Local Insights

Canadian real estate is far from uniform. Regions like Vancouver, Toronto, and Halifax each behave differently due to local demographics, policies, and economic conditions. Agents are immersed in these markets, giving you a clear understanding of fair pricing, growth potential, school zones, and neighbourhood vibes.

For example, survey data shows:

  • 81% of Canadians are more willing to work with a REALTOR® if they adhere to a recognized standard or certification.

  • Among those who’ve used a REALTOR®, 51% were “very satisfied” with their experience —proof of quality service.

3. Expert Negotiation That Can Save or Earn You Thousands

Negotiation isn’t just about price—it’s timing, clauses, contingencies, and more. Data from the U.S. (which aligns with global trends) found agent-assisted sales had a median price of $400,000, compared to $300,000 in FSBO (For Sale By Owner) deals MarketWatch.

Real testimonials from Reddit:

“They refused to put in the offer without some negotiation… Got us big savings on a 1.4 MM purchase.” Reddit
“He pointed out which houses would go under asking (and he was right every single time…)” Reddit

4. Smooth, Risk-Reduced Process & Legal Guidance

Buying a home involves complex paperwork, legal disclosures, and deadlines. Agents reduce your stress by guiding you through:

  • Contracts and clauses,

  • Inspection scheduling,

  • Closing coordination.

This expertise helps avoid pitfalls like missing deadlines or overlooking key details.

In Quebec, real estate agents are even viewed as a form of “insurance” against mistakes, thanks to mandatory professional liability coverage.

5. Established Local Networks & Exclusive Listings

Need a trusted mortgage advisor, inspector, or contractor ASAP? Agents have go-to professionals. They also often hear about “pocket listings”—homes that aren’t publicly listed yet.

6. Trusted Standards & Consumer Protection

REALTOR®s in Canada are governed by CREA’s REALTOR® Code and provincial regulations, ensuring ethical behavior and accountability. That means you’re working with a professional who must legally act in your best interests.

7. Added Value Through Stress Relief & Time Savings

Real estate is overwhelming—constant listings, appointments, legalese. Agents serve as project managers, letting you focus on what matters. From call-backs to scheduling showings, they handle the logistics.

8. Real Canadian Market Trends Support Acting Now

In May 2025, the Greater Toronto Area recorded an 8.4% month-over-month home sales increase to 4,693 units—the biggest jump in four months. Prices nudged up 0.1% to C$992,800, though still down 4.5% year-over-year. Listings rose 14%, and lower interest rates helped affordability.

An expert agent understands when such trends signal opportunity—especially in shifting markets.

09.11.25 | For Buyers

Maple-Glazed Salmon with Roasted Vegetables

Ingredients:

For the salmon glaze:

  • ¼ cup pure maple syrup

  • 2 tbsp soy sauce

  • 1 tbsp Dijon mustard

  • 1 tbsp olive oil

  • 1 clove garlic, minced

  • ½ tsp black pepper

For the salmon:

  • 4 salmon fillets (about 6 oz each)

  • Salt & pepper, to taste

For the roasted vegetables:

  • 2 cups butternut squash, peeled & cubed

  • 2 cups Brussels sprouts, trimmed and halved

  • 2 tbsp olive oil

  • 1 tsp salt

  • ½ tsp black pepper

  • ½ tsp smoked paprika (optional)


Instructions:

  1. Preheat oven to 400°F (200°C). Line a baking sheet with parchment paper.

  2. Prepare vegetables:

    • Toss butternut squash and Brussels sprouts with olive oil, salt, pepper, and smoked paprika.

    • Spread evenly on half of the baking sheet. Roast for 15 minutes.

  3. Prepare glaze:

    • In a small bowl, whisk together maple syrup, soy sauce, Dijon mustard, olive oil, garlic, and black pepper.

  4. Add salmon:

    • Season salmon fillets with a little salt and pepper. Place them on the other half of the baking sheet.

    • Brush generously with the maple glaze.

  5. Roast together:

    • Return sheet to the oven and bake for 12–15 minutes, until salmon flakes easily with a fork and vegetables are caramelized.

    • Halfway through, brush more glaze over the salmon.

  6. Serve:

    • Plate salmon with roasted vegetables. Drizzle with extra glaze if desired.


✨ The result: tender, sweet-savory salmon with rich Canadian maple flavor, balanced by roasted earthy fall vegetables.

08.15.25 | For Buyers

Selling Your Home Faster in Canada: Essential Steps for a Quick Sale

Selling Your Home Faster in Canada: Essential Steps for a Quick Sale

Selling your home in Canada can feel like a complex process, but with the right preparation and strategy, you can make it happen faster—and at the right price. Whether you’re in a bustling market like Toronto or Vancouver, or a more balanced one like Calgary or Halifax, the key lies in preparation, pricing, and presentation. Here are the essential steps to help you sell your home faster in Canada.


1. Understand Your Local Market

Before you list, research the local real estate market. Understand the current trends:

  • Is it a buyer’s or seller’s market?

  • What are similar homes in your area selling for?

  • How long are they staying on the market?

Partnering with a local real estate agent is crucial—they’ll give you insights into market conditions, pricing strategy, and buyer behavior in your neighborhood.

2. Choose the Right Realtor

Not all realtors are created equal. Choose someone with a proven track record in your area, strong marketing skills, and local knowledge. Ask for a comparative market analysis (CMA), testimonials, and their marketing plan before signing a listing agreement.

3. Price It Right from the Start

One of the biggest mistakes sellers make is overpricing. Homes that sit on the market too long become stale, leading to price drops and lower final sale prices. Use your agent’s CMA to set a competitive price from the beginning—it’ll attract more buyers and could even spark multiple offers.

4. Declutter, Depersonalize, and Deep Clean

First impressions matter. Prepare your home so potential buyers can imagine themselves living there:

  • Declutter to make rooms feel bigger and more open.

  • Depersonalize by removing family photos and bold décor.

  • Deep clean everything—from windows to carpets to appliances.

A fresh coat of neutral paint can also do wonders.

5. Stage Your Home

Home staging helps highlight your home’s strengths and downplay its weaknesses. Professional stagers know how to create an inviting and aspirational space that appeals to a broad range of buyers. In many cases, staged homes sell faster and for more money.

6. Invest in High-Quality Photos & Virtual Tours

Most buyers begin their search online. Eye-catching, professional photography and virtual tours are non-negotiable in today’s market. They make your listing stand out and give buyers a strong first impression before they ever set foot inside.

7. Market Aggressively

Your agent should list your home on the MLS and syndicate it to major real estate websites. But go beyond the basics:

  • Use social media marketing.

  • Create targeted online ads.

  • Offer video walkthroughs and reels.

  • Hold virtual open houses when appropriate.

The more eyes on your property, the faster it will sell.

8. Be Flexible with Showings

The more flexible you are with showings, the more buyers you’ll attract. Be ready for short-notice viewings and keep your home in “show-ready” condition. Consider temporarily relocating if you expect a high volume of showings.

9. Respond Quickly to Offers

Speed is key. If a buyer makes an offer, respond promptly. Being slow to reply can cost you the deal. Work closely with your realtor to review offers, negotiate effectively, and make counteroffers where needed.

10. Be Prepared for the Closing Process

Once you accept an offer, the sale isn’t over. Be prepared for:

  • Home inspections

  • Appraisals

  • Buyer financing

Have all your paperwork ready and stay in close contact with your lawyer or notary to ensure a smooth closing.

Final Thoughts

Selling your home quickly in Canada is achievable with the right approach. From pricing and staging to marketing and flexibility, each step plays a crucial role. A well-prepared home, backed by a knowledgeable agent, stands out in any market—and gets sold faster.

📝 Thinking of selling your home soon? Start with a consultation and find out what your home is really worth in today’s market.

From pricing and staging to negotiating and closing—we’ll walk you through every step to get you sold quickly and confidently.

📞 Book your free home value assessment today!
📧 info@katherinebarnett.com | 🌐 https://www.katherinebarnett.com/ | 📱 416.856.5161

08.15.25 | For Buyers

Maple Dijon Grilled Chicken

Here’s a simple and delicious Maple Dijon Grilled Chicken recipe, perfect for August barbecues in Canada:

🧂 Ingredients:

  • 4 boneless, skinless chicken breasts

  • 1/4 cup pure maple syrup

  • 3 tablespoons Dijon mustard

  • 2 tablespoons olive oil

  • 2 tablespoons apple cider vinegar (or lemon juice)

  • 2 garlic cloves, minced

  • Salt and pepper to taste

  • Optional: fresh thyme or rosemary for garnish


🔥 Instructions:

  1. Make the Marinade
    In a bowl, whisk together maple syrup, Dijon mustard, olive oil, vinegar, minced garlic, salt, and pepper.

  2. Marinate the Chicken
    Place the chicken in a resealable bag or dish. Pour the marinade over it. Seal and refrigerate for at least 1 hour (or up to 8 hours for more flavor).

  3. Preheat Grill
    Heat your grill to medium-high and lightly oil the grates.

  4. Grill the Chicken
    Remove chicken from the marinade. Grill for 6–7 minutes per side, or until fully cooked (internal temp: 165°F / 74°C). Baste with reserved marinade during grilling if desired.

  5. Rest & Serve
    Let rest 5 minutes before serving. Garnish with fresh herbs and serve with corn salad, roasted veggies, or grilled peaches.


🍽️ Serving Tip:

Pairs beautifully with a grilled corn & tomato salad, fresh lemonade, or iced peach tea!

07.10.25 | For Buyers

Why Hiring a Real Estate Agent in 2025 Is Still a Smart Move

🏡 Why Hiring a Real Estate Agent in 2025 Is Still a Smart Move

In today’s digital world, it can be tempting to think you can buy or sell a home on your own. After all, you’ve got online listings, mortgage calculators, and neighborhood data at your fingertips. But behind every smooth real estate transaction is a great deal of work—and often, a great agent.

Whether you’re a first-time buyer, a seasoned seller, or somewhere in between, having an experienced real estate professional by your side can save you money, time, and stress.

Here are 10 compelling reasons why working with a real estate agent is still the smartest move in 2025:


1️⃣ Pricing Expertise That Pays Off

Real estate agents are market experts. They perform detailed Comparative Market Analyses (CMAs) to help sellers price competitively—and help buyers avoid overpaying. Their insight into current trends, local demand, and historical pricing ensures you’re working with numbers that make sense.


2️⃣ Exclusive Access to the MLS

The Multiple Listing Service (MLS) is the heartbeat of real estate data. While consumer sites show listings, they often miss out on real-time updates or full details. Agents use the MLS to help you access the most accurate, up-to-date properties—often before they hit public platforms.


3️⃣ Powerful Negotiation Skills

Real estate agents are trained negotiators. They know when to push, when to wait, and how to approach offers and counteroffers to maximize value for you. Whether it’s price, repairs, or contingencies—your agent acts as a strategic, emotionally neutral advocate.


4️⃣ A Paperwork Pro

From contracts to disclosures to inspection reports, real estate involves a mountain of paperwork. Your agent will handle it with precision, ensuring every form is filled out correctly, signed where needed, and submitted on time—so you avoid costly delays or legal issues.


5️⃣ In-Depth Market Knowledge

Agents stay in tune with local and national trends, giving you insight into the best times to buy or sell. They can also suggest alternatives—like investing in up-and-coming areas or selling your current home before buying your next one. It’s expertise you simply can’t get from a search engine.


6️⃣ A Trusted Professional Network

Need a lender? A home inspector? A moving company? Your agent has you covered. Tap into their vetted network of service providers—saving you hours of research and helping you avoid unreliable options during a time-sensitive process.


7️⃣ They Save You Time

Real estate agents do the heavy lifting. From scheduling showings to coordinating inspections and marketing your listing, they handle it all. Many even drive you to viewings, freeing you up to focus on decisions—not logistics.


8️⃣ Emotional Support (Yes, Really)

Buying or selling a home is emotional—there’s no way around it. An experienced agent helps keep you grounded, offering objective advice during high-stress moments. They celebrate your wins and help you bounce back from disappointments, acting as both advocate and coach.


9️⃣ Contract Confidence

Real estate contracts are legally binding. Even a small oversight can lead to big problems. Your agent ensures everything is accurate, complete, and legally compliant—giving you peace of mind and a solid foundation for your transaction.


🔟 Ongoing Support After the Sale

A great real estate agent isn’t just there for the closing—they’re in it for the long haul. Whether you need a handyman, another property, or advice on the market down the road, your agent is part of your trusted post-sale support team.


🏠 So… Should You Hire an Agent?

Yes—especially if you want the process to be smooth, efficient, and financially smart. While DIY real estate is technically possible, the risks often outweigh the savings. Hiring a qualified real estate agent means getting a trusted partner who looks out for your best interests from start to finish—and beyond.


Thinking of buying or selling? Reach out to a local agent today. You’ll be glad you did.


Source: RE/MAX

07.10.25 | For Buyers

Seared Salmon with Buttery Couscous and Mango Salsa

A light and flavorful dish featuring perfectly seared salmon served over buttery couscous, topped with a fresh and zesty mango salsa—perfect for a quick summer dinner!

🧄 Ingredients

For the Salmon:

  • 4 salmon fillets (skin-on or off, your choice)

  • Salt and pepper, to taste

  • 1 tbsp olive oil

  • 1 tbsp butter

  • Juice of ½ lemon

For the Buttery Couscous:

  • 1 cup couscous

  • 1 cup chicken or vegetable broth

  • 1 tbsp butter

  • Salt, to taste

  • Fresh parsley (optional, for garnish)

For the Mango Salsa:

  • 1 ripe mango, diced

  • ½ red bell pepper, diced

  • ¼ red onion, finely chopped

  • 1 small jalapeño, finely chopped (optional, for heat)

  • Juice of 1 lime

  • 2 tbsp chopped fresh cilantro

  • Salt, to taste


🍽️ Instructions

1. Make the Mango Salsa:

In a bowl, combine mango, red bell pepper, red onion, jalapeño (if using), lime juice, cilantro, and salt. Toss well and chill in the fridge while you prep the rest.

2. Prepare the Couscous:

  • In a small pot, bring broth to a boil.

  • Stir in couscous, butter, and a pinch of salt.

  • Cover and remove from heat. Let sit for 5 minutes, then fluff with a fork.

3. Cook the Salmon:

  • Season salmon with salt and pepper.

  • Heat olive oil in a skillet over medium-high heat.

  • Sear salmon (skin-side down if applicable) for 3–4 minutes until golden and crispy.

  • Flip and cook another 2–4 minutes (depending on thickness), adding butter and lemon juice during the last minute to baste.

4. Assemble:

Spoon couscous onto plates, top with seared salmon, and finish with a generous scoop of mango salsa.


Tips:

  • You can substitute mango with pineapple or peach for variety.

  • Add avocado to the salsa for creaminess.

  • For extra texture, toss toasted almonds or pine nuts into the couscous.

06.12.25 | For Buyers

Budget-Friendly Renovation Tips to Refresh Your Home Without Breaking the Bank

Dreaming of a home makeover but working with a limited budget? You’re not alone—and the good news is, you don’t need a massive bankroll to transform your space. With the right approach, home renovations can boost your property value and refresh your surroundings without draining your savings.

Whether you’re aiming for better functionality, updated aesthetics, or simply a fresh feel, here are essential do’s and don’ts to help you renovate smart, stylish, and within budget.


🛠️ DIY or Call the Pros?

✅ DO: Know your limits before diving into a DIY project
While DIY renovations can save money, they’re not one-size-fits-all. Be honest about your time, tools, skills, and physical abilities. Tackle projects that are within your comfort zone, and don’t hesitate to outsource the rest.

🚫 DON’T: Take risks with health or safety
Jobs that involve mold, asbestos, lead, or require plumbing or electrical work are best left to licensed professionals. A poorly executed DIY could cost more in the long run to fix than hiring an expert in the first place.

💡 Quick Tip: Budget extra for DIY surprises—unexpected costs are almost inevitable, and padding your estimate helps prevent headaches.


♻️ Maximize What You Already Own

✅ DO: Reimagine your existing layout and décor
Sometimes, a room doesn’t need new stuff—it just needs a fresh perspective. Try rearranging furniture or swapping items between rooms to create a new flow and feel.

🚫 DON’T: Underestimate the power of small changes
Revamping a room might be as easy as updating lighting, changing pillow covers, or adding a pop of color through accessories. Even reframing art or using oversized matting can transform the look of your walls.

💡 Quick Tip: Hanging frames or wall grids are inexpensive ways to create gallery-style effects with existing photos, posters, or maps.


🔄 Repurpose Before You Replace

✅ DO: Give old pieces a second life
Before tossing out cabinets or furniture, think about how you can update them. Repainting cabinets, refinishing wood furniture, or replacing outdated hardware can make a huge impact at a fraction of the cost.

🚫 DON’T: Rush to replace items that just need a facelift
Many elements in your home—like light fixtures, drawer pulls, or doors—can be modernized rather than replaced entirely.

💡 Quick Tip: Swapping out knobs, faucets, or light switch covers is an easy upgrade with a big payoff in appearance.


🏗️ Know When Permits Are a Must

🚫 DON’T: Skip the legal steps for major renovations
Planning to knock down a wall, add a bathroom, or convert space into a bedroom? Make sure to check your local building codes and apply for the necessary permits.

✅ DO: Plan ahead to avoid costly delays
Permit approvals can take time. Start early to avoid stalling your renovation timeline.

💡 Quick Tip: Your city’s website usually outlines permitting requirements—review them before you commit to a project.


🎨 Get Creative and Have Fun

✅ DO: Infuse personality into your home
Renovations don’t have to be serious and sterile. Add pops of color that lift your mood, try peel-and-stick wallpaper for bold (but temporary) statements, or mix materials like wood, stone, and fabric for added texture.

🚫 DON’T: Neglect your outdoor space
Simple outdoor upgrades—like planting seasonal flowers or adding solar lighting—can enhance curb appeal. For low-maintenance beauty, look into xeriscaping or native plants that thrive in your local climate.

💡 Quick Tip: Even your front door can get a facelift—paint it a bold color for an instant style boost.


💬 Final Thoughts

Transforming your home doesn’t require a massive investment. With a little creativity, strategic planning, and a willingness to repurpose, you can breathe new life into your space—and maybe even boost your property value while you’re at it. Remember: Smart renovations aren’t just about how much you spend—they’re about how thoughtfully you invest your time and resources.


Source: RE/MAX

06.12.25 | For Buyers

Spicy Tuna Wraps with Homemade Chipotle Greek Yogurt Ranch

Easy, flavorful tuna wraps drizzled with light chipotle Greek yogurt ranch dressing. They’re the perfect summertime lunch and packed with delicious farmer’s market veggies.

Ingredients

  • 2 (10 inch) whole wheat or gluten free tortillas
  • ½ cup chopped romaine hearts
  • 1 roma tomato, sliced
  • 1/4 cup roasted fresh corn (or can used canned)
  • ½ avocado, sliced
  • 2 tablespoons chopped green onions
  • 1 can Genova Seafood Albacore Tuna, drained

For the chipotle ranch dressing:

  • ¼ cup nonfat plain greek yogurt
  • ½ teaspoon garlic powder
  • 1/8 teaspoon onion powder
  • 1/2 teaspoon fresh lemon juice (or can sub apple cider vinegar)
  • 1/4 teaspoon dried dill
  • ¼ teaspoon salt
  • ¼-½ teaspoon chipotle chili powder (depending how spicy you like it)
  • 1 tablespoon water to thin dressing

Instructions

Step 1

Lay out two tortillas on a large cutting board. Divide the lettuce, tomato, corn, avocado slices, green onion and tuna between each tortilla.

Step 2

Drizzle each wrap with 1 tablespoon of the dressing, reserving the rest for dipping.

Step 3

Roll up each tortilla, tucking in the ends as you go.

Step 4

Enjoy immediately with the extra chipotle ranch, or wrap in plastic wrap and keep in fridge for up to 3 days (for optimal freshness).
Recipe by: Monique Volz // Ambitious Kitchen